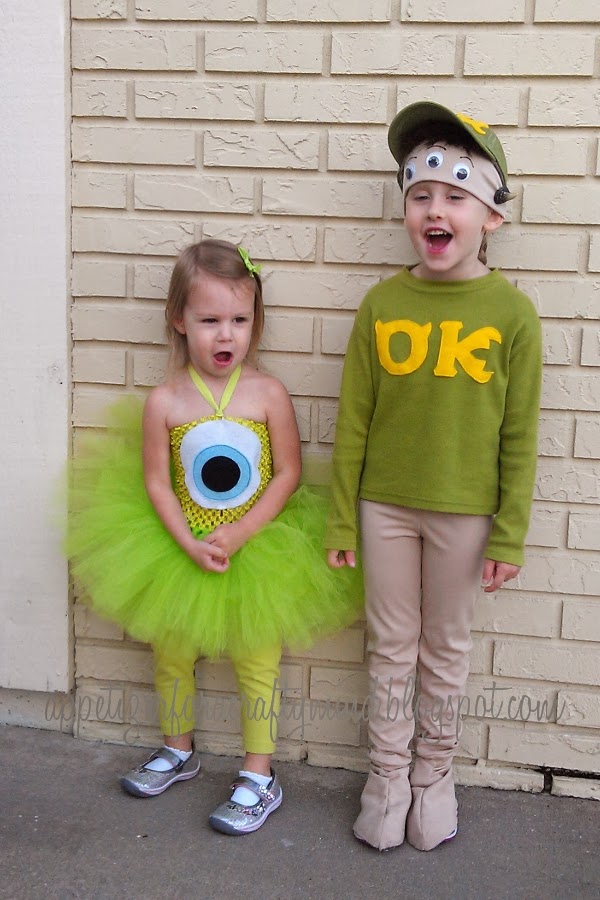
The kids are giving a big roar :) Charlotte wanted to be Scott "Squishy" Squibbles from Monsters University. I tried to talk her out of it because I had no clue on how to even go about making her costume! She begged and begged, so "sigh" I busted my butt and made it happen...lol. When I asked Evelyn if she wanted to be Mike Wazowski she gave me an excited "yes!". Hers was the easy one ;)
For Mike I ordered an 8" crochet tutu top and three spools of 6" tulle from
Deana's Crafts on Etsy. I used this
video tutorial to make the tutu dress. After I was finished I made an eye out of felt and hand sewed it in a few spots to attach it to the dress. It took a couple of hours from start to finish. I got lucky and had a pair of leggings already in the perfect color.
I really wish Squishy was as easy as Mike. I bought some polyester fabric in light tan color and used Make It & Love It
legging tutorial to make my own pattern. I gave myself a 5/8" seam allowance since that is what I'm used to. I didn't like the double needle on my seams but it does give a nice finish to hem lines. Instead for my seams I just used a straight stitch. After I was finished making the leggings and seeing if they fit her, she informed me that Squishy doesn't wear shoes. Sigh...I used her shoes and did the same process as the leggings to make a pattern for shoe covers. It took two attempts to make them cover and not be too tight or loose. The really hard part was attaching them to the bottom of the leggings because of the small ankle opening.
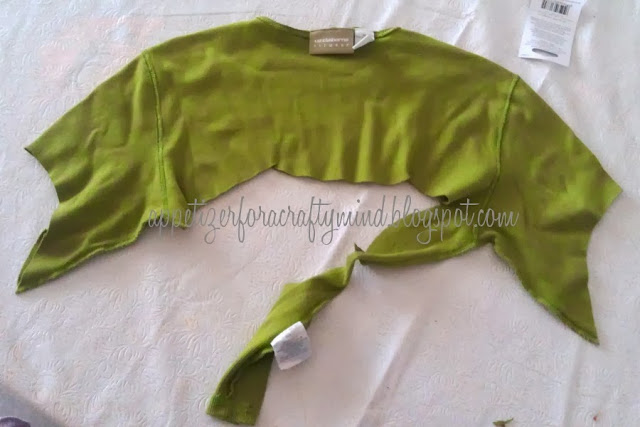
I looked for a shirt already in her size that would work but couldn't find one. I came across a really soft and nice Liz Claiborne shirt at a thrift store that was the perfect color. I again took a shirt that I liked the fit and made my own pattern. I made sure to use the bottom hem and sleeve hems to save me lots of time. The shirt was almost a turtle neck so I used that piece to make the finished neckline. To make it lay flat and look more professional I went over it with my double needle.
I also couldn't find a green hat in toddler size. I bought a white
Rabbit Skins baseball cap and dyed it using
Rit Apple Green dye. I only left the hat in the dye for about 10 to 15 minutes. I constantly stirred it and checked it often until it got slightly darker than I wanted it to be. I then rinsed it until no more color was coming out and washed it on delicate cycle in our washing machine.
I used yellow felt to cut out the Oozma Kappa letters and sewed them on using my machine. The hat was super tricky to do but I really didn't want to do it by hand ;)
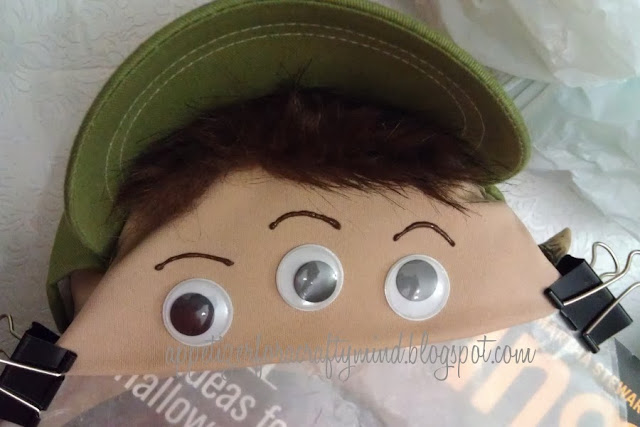
To give her some eyes I took the same polyester fabric that I used to make her hat and made a forehead band that fit her snug. To make the band I folded and very wide piece of fabric in half lengthwise and stitched it together to form the band (leaving the top open). To figure out the length, I put the band on her where we wanted it to sit, and then put the hat on. I made sure to tuck the band so that it tapered and would leave the back hat adjustment open (hope that makes sense). Using a disappearing ink pen I traced where the hat meets with the band. I cut the seam out of the band so that it would be one long folded over piece again. Lining up the line, I pinned the fabric to the band inside the hat. I had to hand stitch it :( I made sure to sew far enough up so that would be able to tuck and sew in his hair. I trimmed all the excess fabric after I made sure if fit her right.
The hair is actually fake fur. I bought the smallest sliver they would cut me. It turned out to be the exact width! I folded it over and played with the section until it looked like real hair. Then just winging it, I sewed it in.
Next came the eyes and eyebrows. I found large googly eyes at the Dollar Store and used
Elmer's CraftBond Fabric & Paper Glue to glue them to the fabric. I just followed the directions and they held on awesome! We still haven't lost one and she wore it to a Trunk or Treat, Trick or Treating around our neighborhood, and to school. I had planned on sewing on eyebrows but decided to do the easy thing and use brown puffy paint.
The horn I already had from a long, long time ago. I had always planned on sewing it onto a hoodie. I just stitched it in the place that Squishy's horn would be.
Even though it was a real pain to make, I'm really happy she got to be exactly who she wanted to be!
This project is at the following link-up parties:


No comments:
Post a Comment